Who wants to see something Fantastic
So it's been a while since I've been here, about 6 years in fact. Where is here you ask? Designing a new cosplay! The last time I made one was way back in 2019, 6 years ago now when I made a Spider Gwen suit. I fell out of the habit in 2020 for obviously covid related reasons, cons just weren't running so I didn't have the motivation to make them in the same way. It took a few years before conventions started running again here and by that point my habits were changed, even if I did have a desire to make a cosplay, I didn't watch media in the same way to have characters that inspire me. But no longer is that the case, for I, the indecisive, have finally made a decision to make an Invisible Women cosplay from Marvel Rivals. Now I will admit that there was still a lot of indecision on which skin to make, at first I wanted to make the Blood Shield skin, but after researching the colours I need I found it would be quite hard to get the shades of grey. Next thought was the regular base skin but that also got ruled out because I didn't have any more of the right shade of blue left. After looking at the options some more I realised the First Family skin looked pretty do-able, same design as the default skin, but in different colours and I even thought I already had the colours.
The next step is coming up with a rough plan for it, so I grabbed my sketch book and... well... started sketching! The goal here is not to plan it out exactly, but just to get a rough idea as to what the pattern pieces might look like with the different coloured segments.
 This is what I came up with, and it felt quite do-able. The arm looked to be the hardest part, as you can tell by my note of "Arm detail up top looks quite hard". Actually during writing this I looked at the sketch again and noticed I did this before I picked the skin I was going to do. There's a note on the top right about colours and not having the right ones, this would be from looking at the base skins colours and not the colour swapped First Family that I went with in the end. So I guess technically this post lists things slightly out of order, sorry!
From there, the next step is making a more detailed plan of how this will look on the pattern pieces for a catsuit. Thankfully I've already got a very good catsuit pattern that I can use, so that saves a lot of time and effort (and believe me, it took A LOT of time and effort.) But as a bit of a new method as to how to tackle this challenge, I took my digital pattern and exported all the pieces I would need to an image, which I then imported into Procreate on my iPad to draw on top of. Last time I made a cosplay I had neither the iPad nor this pattern so well refined to work on, so they have been amazing tools to leverage in this process.
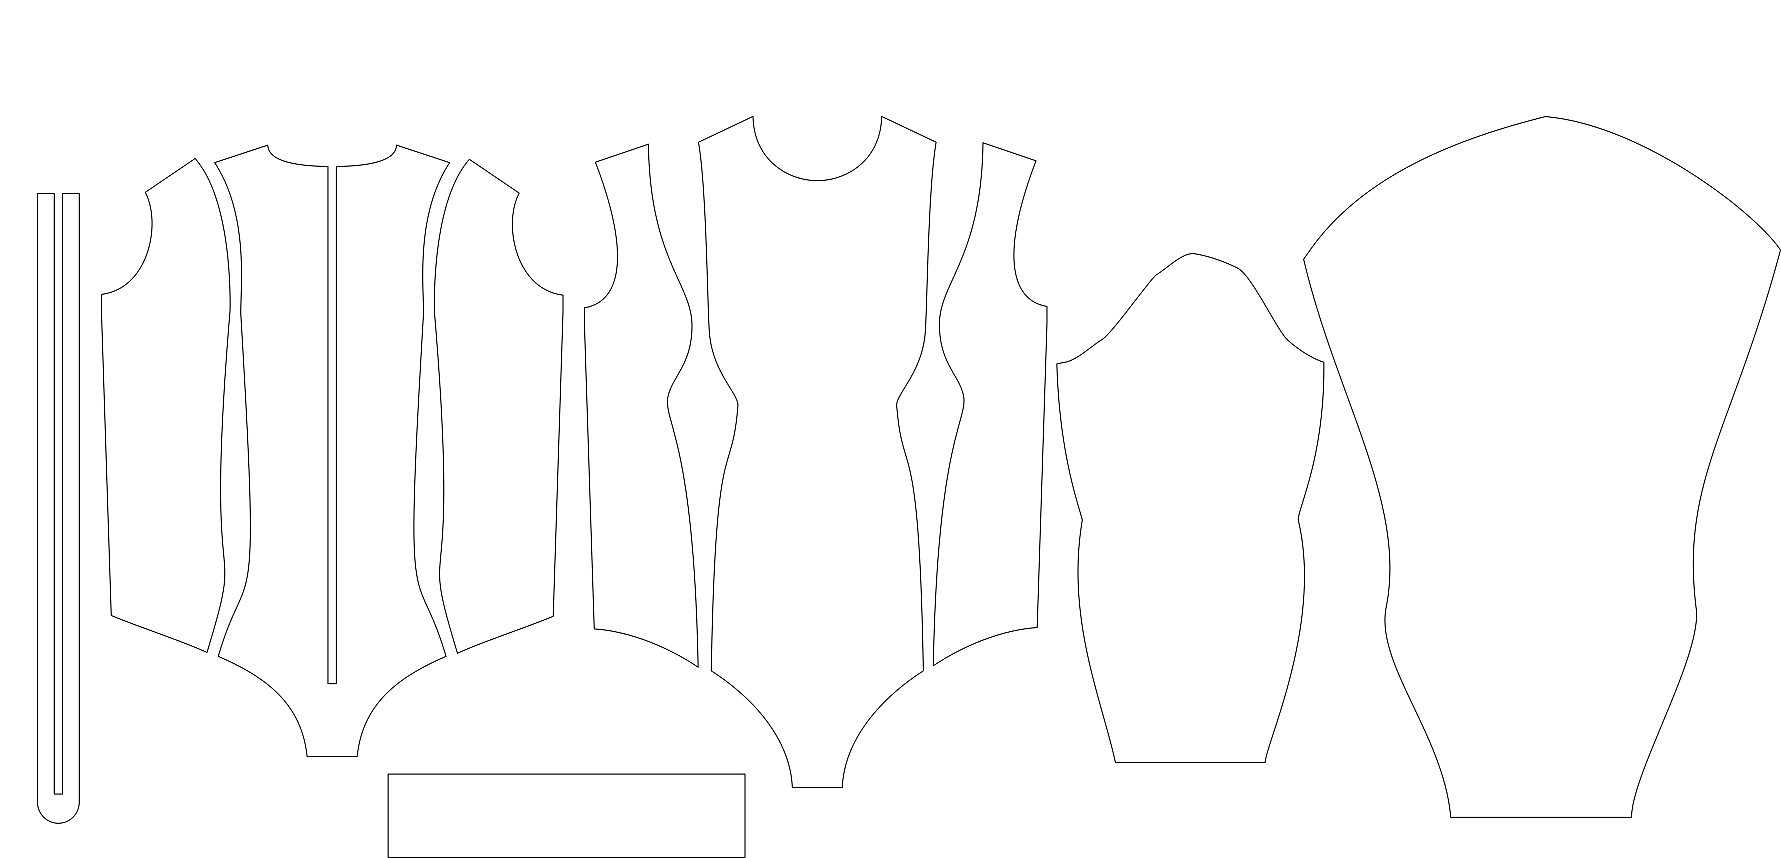 First off I did a rough pass over everything, trying to figure it all out. None of it I felt was too bad to work out but it took me probably 2-3 hours of work to get it all sorted. The worst part by far was the arm and trying to get good reference pictures to see around it from in game. Eventually my partner suggested I just open a replay of a game and pause it which was a massive help and I can't believe I didn't think of this sooner.
There's 3 main categories to this design, you have the base pattern that will get cut up and joined with matching segments of other colours to make up the suit. Then you have appliques, smaller details that will go on top of the base suit as they are not big enough to warrant cutting it out of the full suit and adding those complexities. Finally in this design you also have a belt that will go separately on top of this, due to the shape of this belt I'm not entirely sure if it'll stick in the right place correctly, so I may use some magnets to help with that (ps this is literally a thought I had while writing this).
First off I did a rough pass over everything, trying to figure it all out. None of it I felt was too bad to work out but it took me probably 2-3 hours of work to get it all sorted. The worst part by far was the arm and trying to get good reference pictures to see around it from in game. Eventually my partner suggested I just open a replay of a game and pause it which was a massive help and I can't believe I didn't think of this sooner.
There's 3 main categories to this design, you have the base pattern that will get cut up and joined with matching segments of other colours to make up the suit. Then you have appliques, smaller details that will go on top of the base suit as they are not big enough to warrant cutting it out of the full suit and adding those complexities. Finally in this design you also have a belt that will go separately on top of this, due to the shape of this belt I'm not entirely sure if it'll stick in the right place correctly, so I may use some magnets to help with that (ps this is literally a thought I had while writing this).
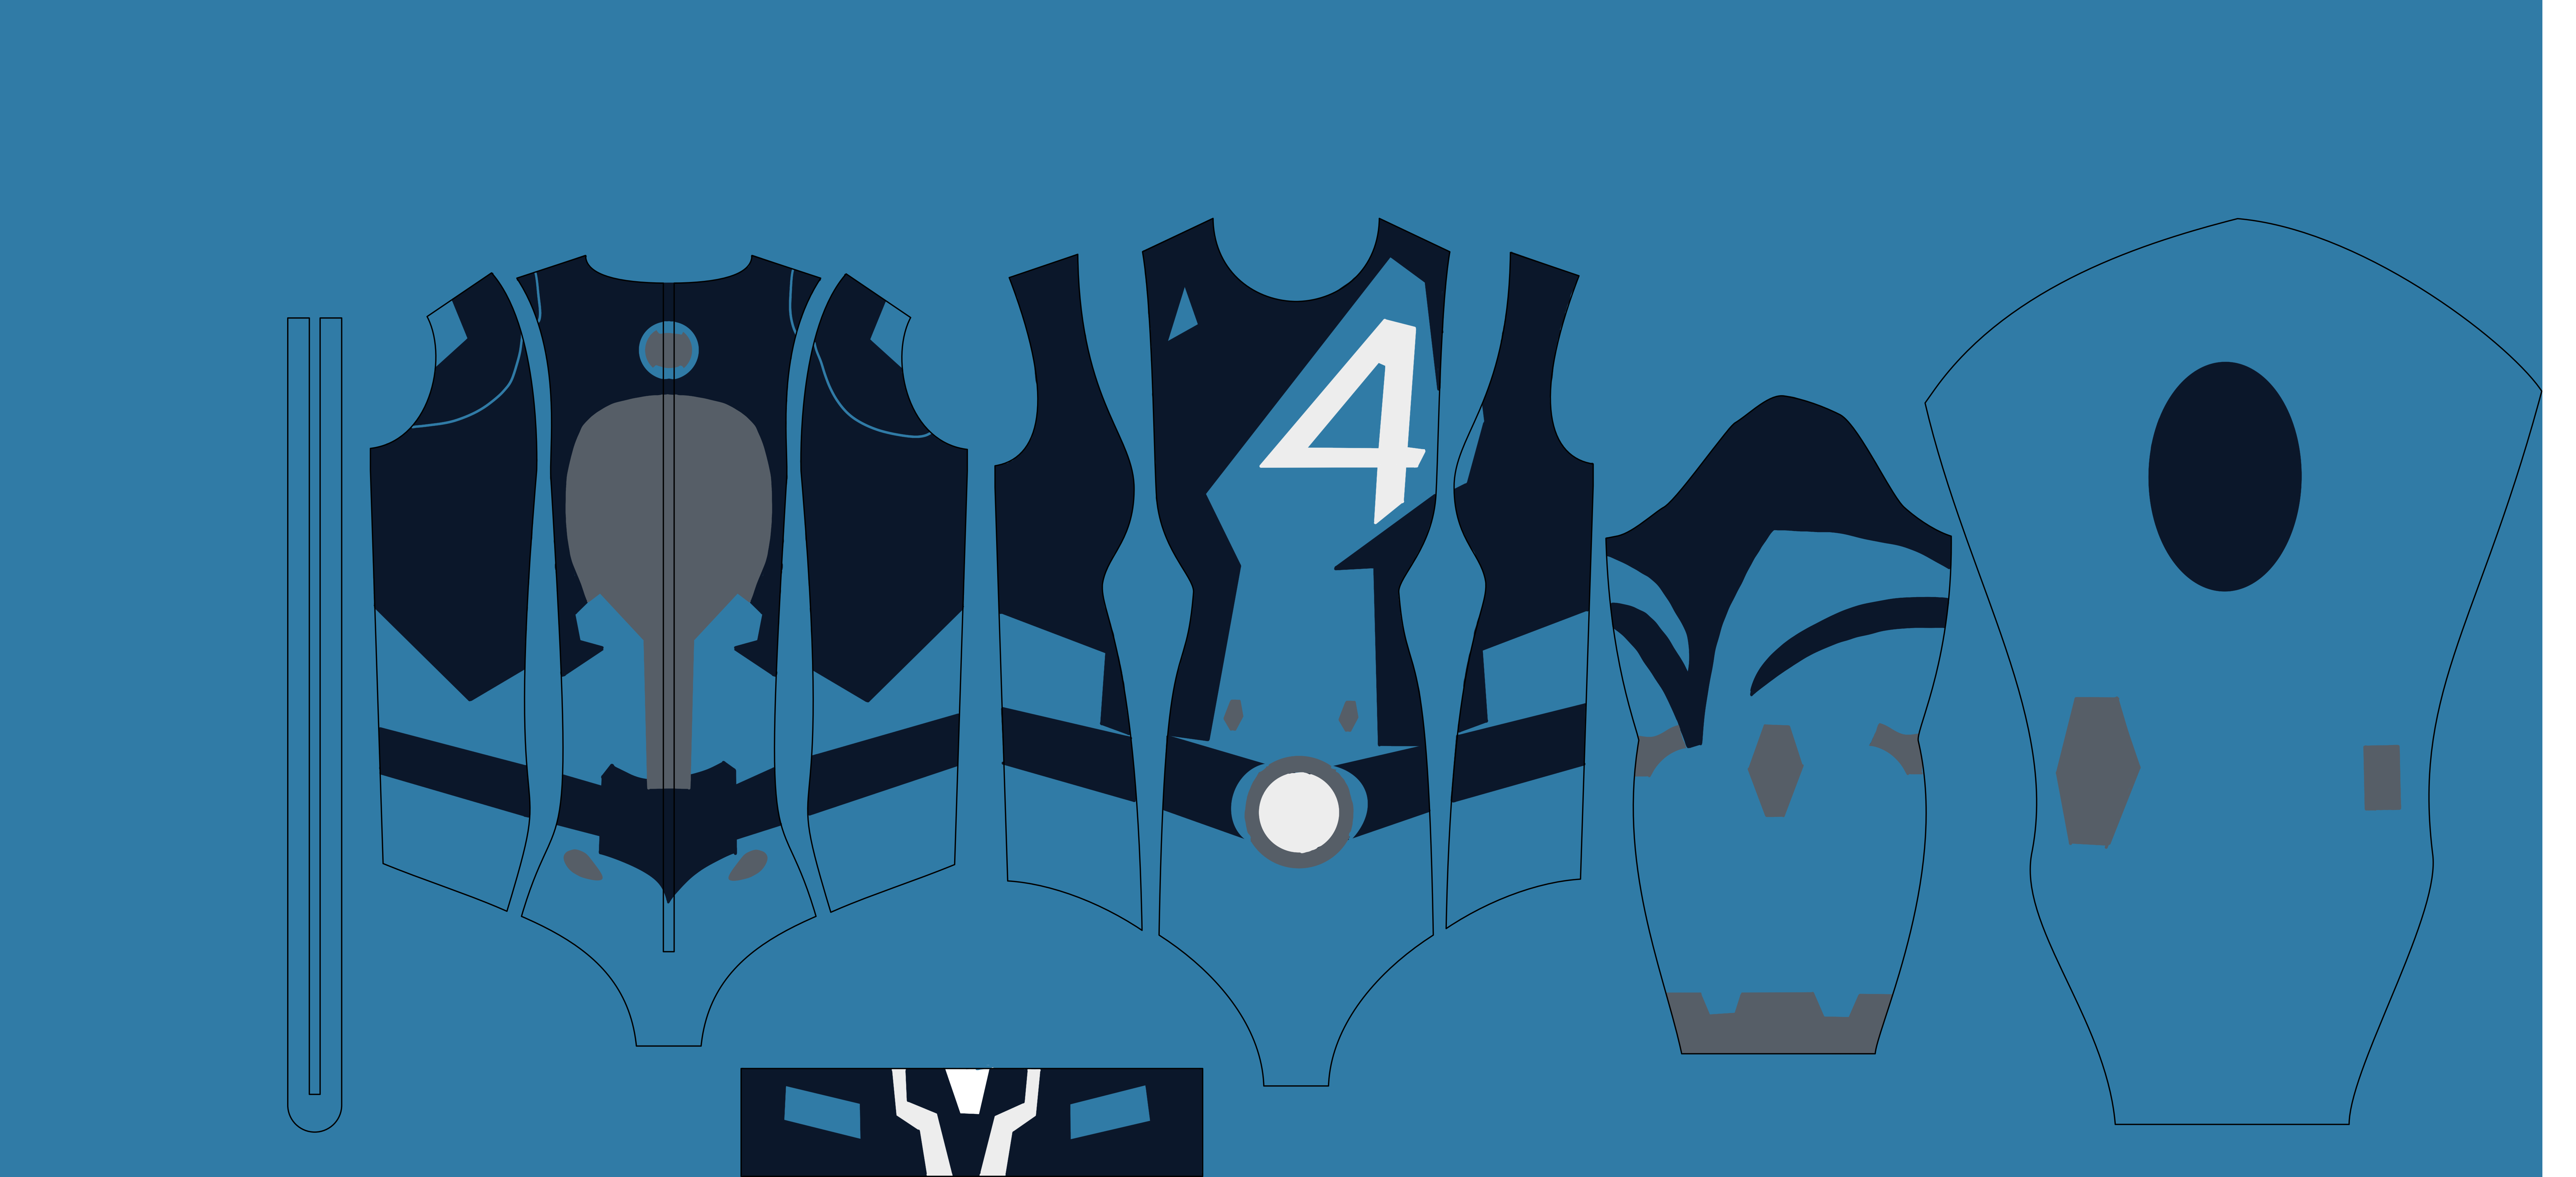 With the rough pass done figuring it all out, I spent another 30-60 mins just going over it all and making a neater version. This version also split the base, applique and belt sections into separate layers in procreate, so that when I come to make the pattern I don't have to figure out which is which, that's already done for me. Which leads to the next step of the the pattern, which as of writing this I have not started. With this work before hand it should be relatively simple, it will just be recreating what I've already drawn out, and just making sure things line up properly when going between the pattern pieces, as well as planning which sides have the seam allowance as they have to overlap a bit.
This post will be the first in a few about this project, so look forward to reading more about this in the future! With AVCON rapidly approaching in early July, and that's my goal I have to get a move on and sort it out. (ps, I'm posting this much later than I wrote it, so expect the other parts potentially after AVCON)
The final thing I will leave you with, if my blog will allow it properly (guess you'll be able to tell by now if it's there or if I had to edit this) is a time lapse of the process in Procreate, I love that it records it automatically as I just think it's so interesting to see how I tackle these things.
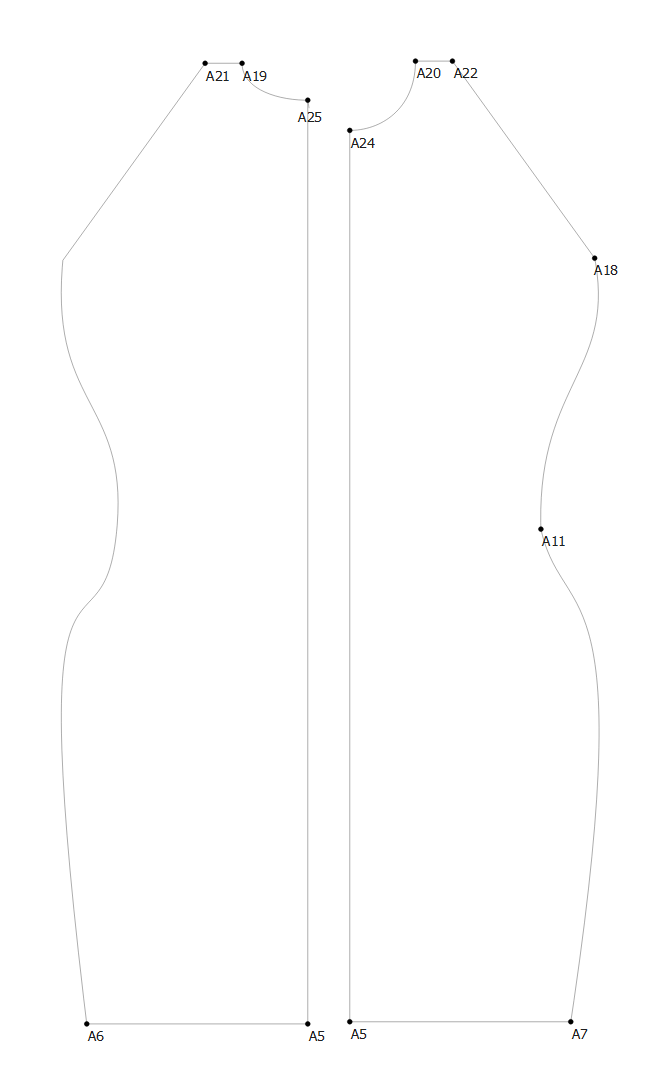
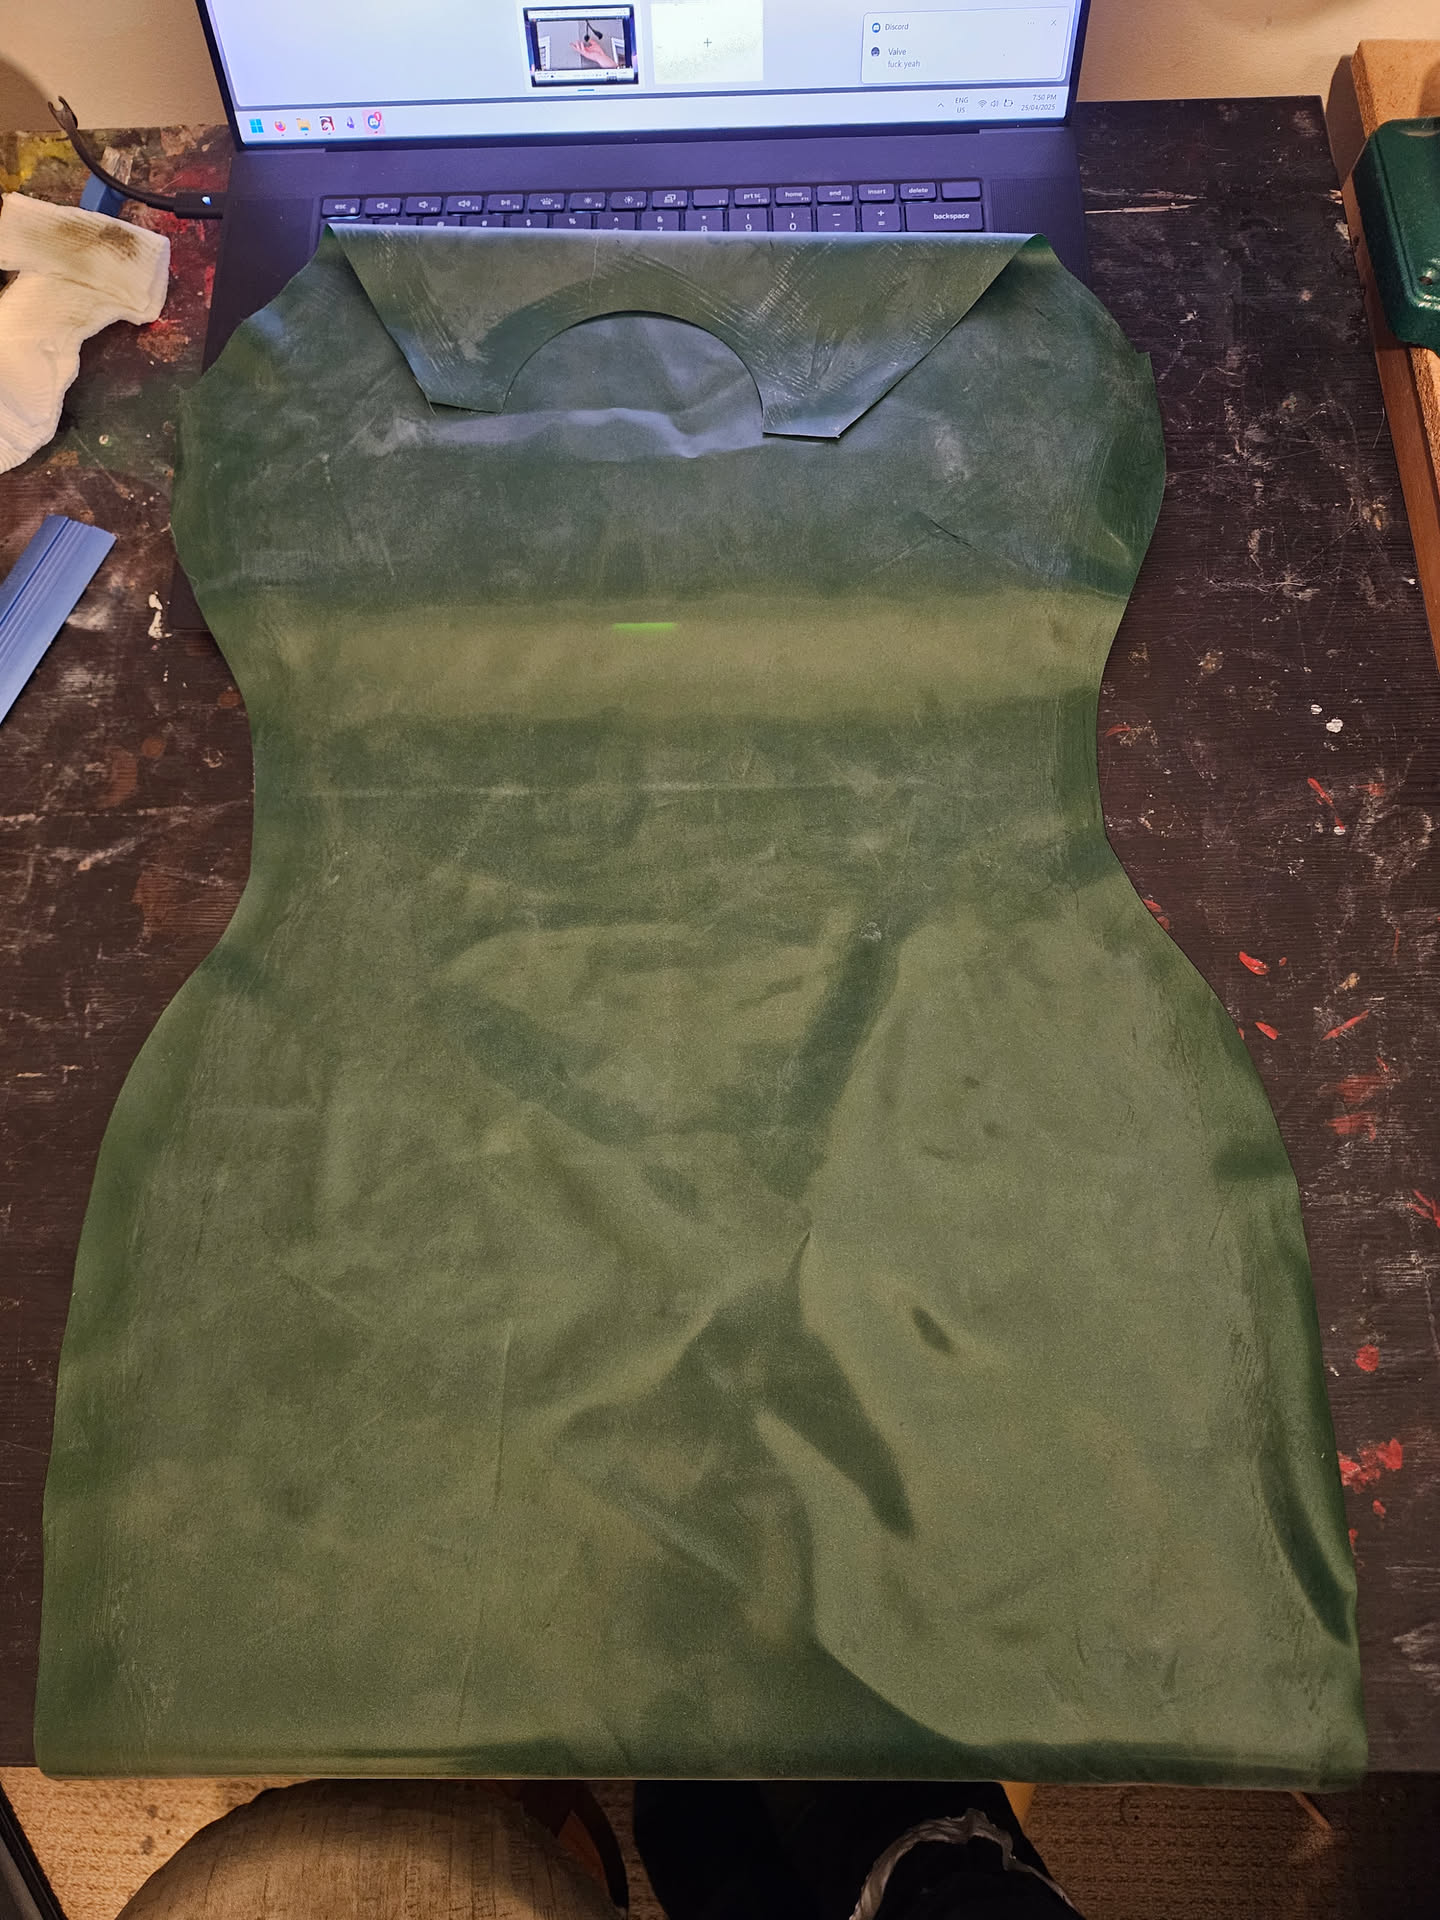
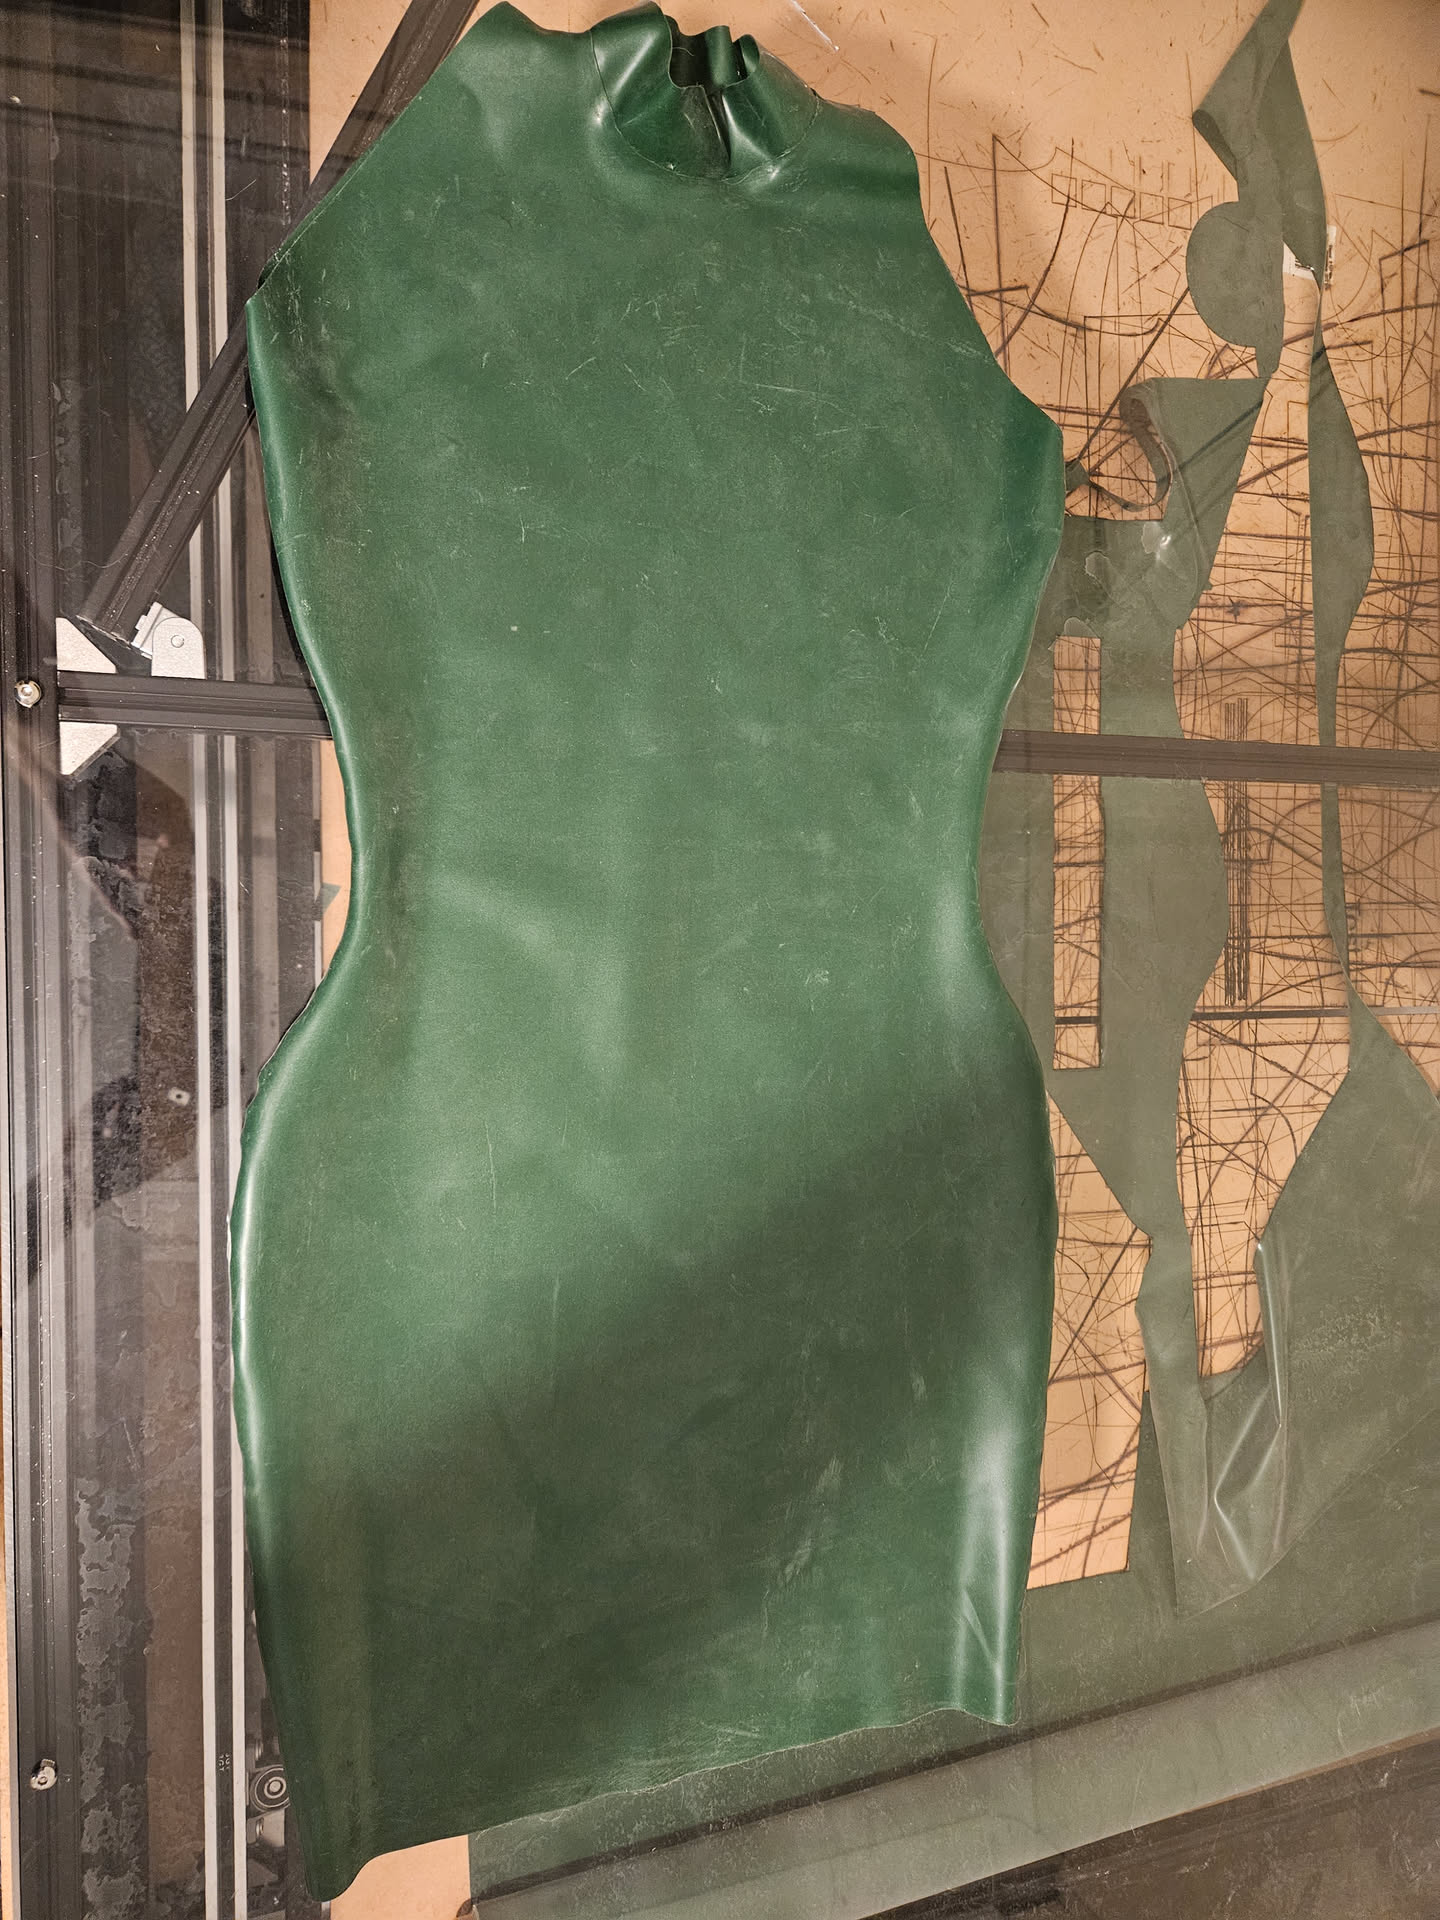
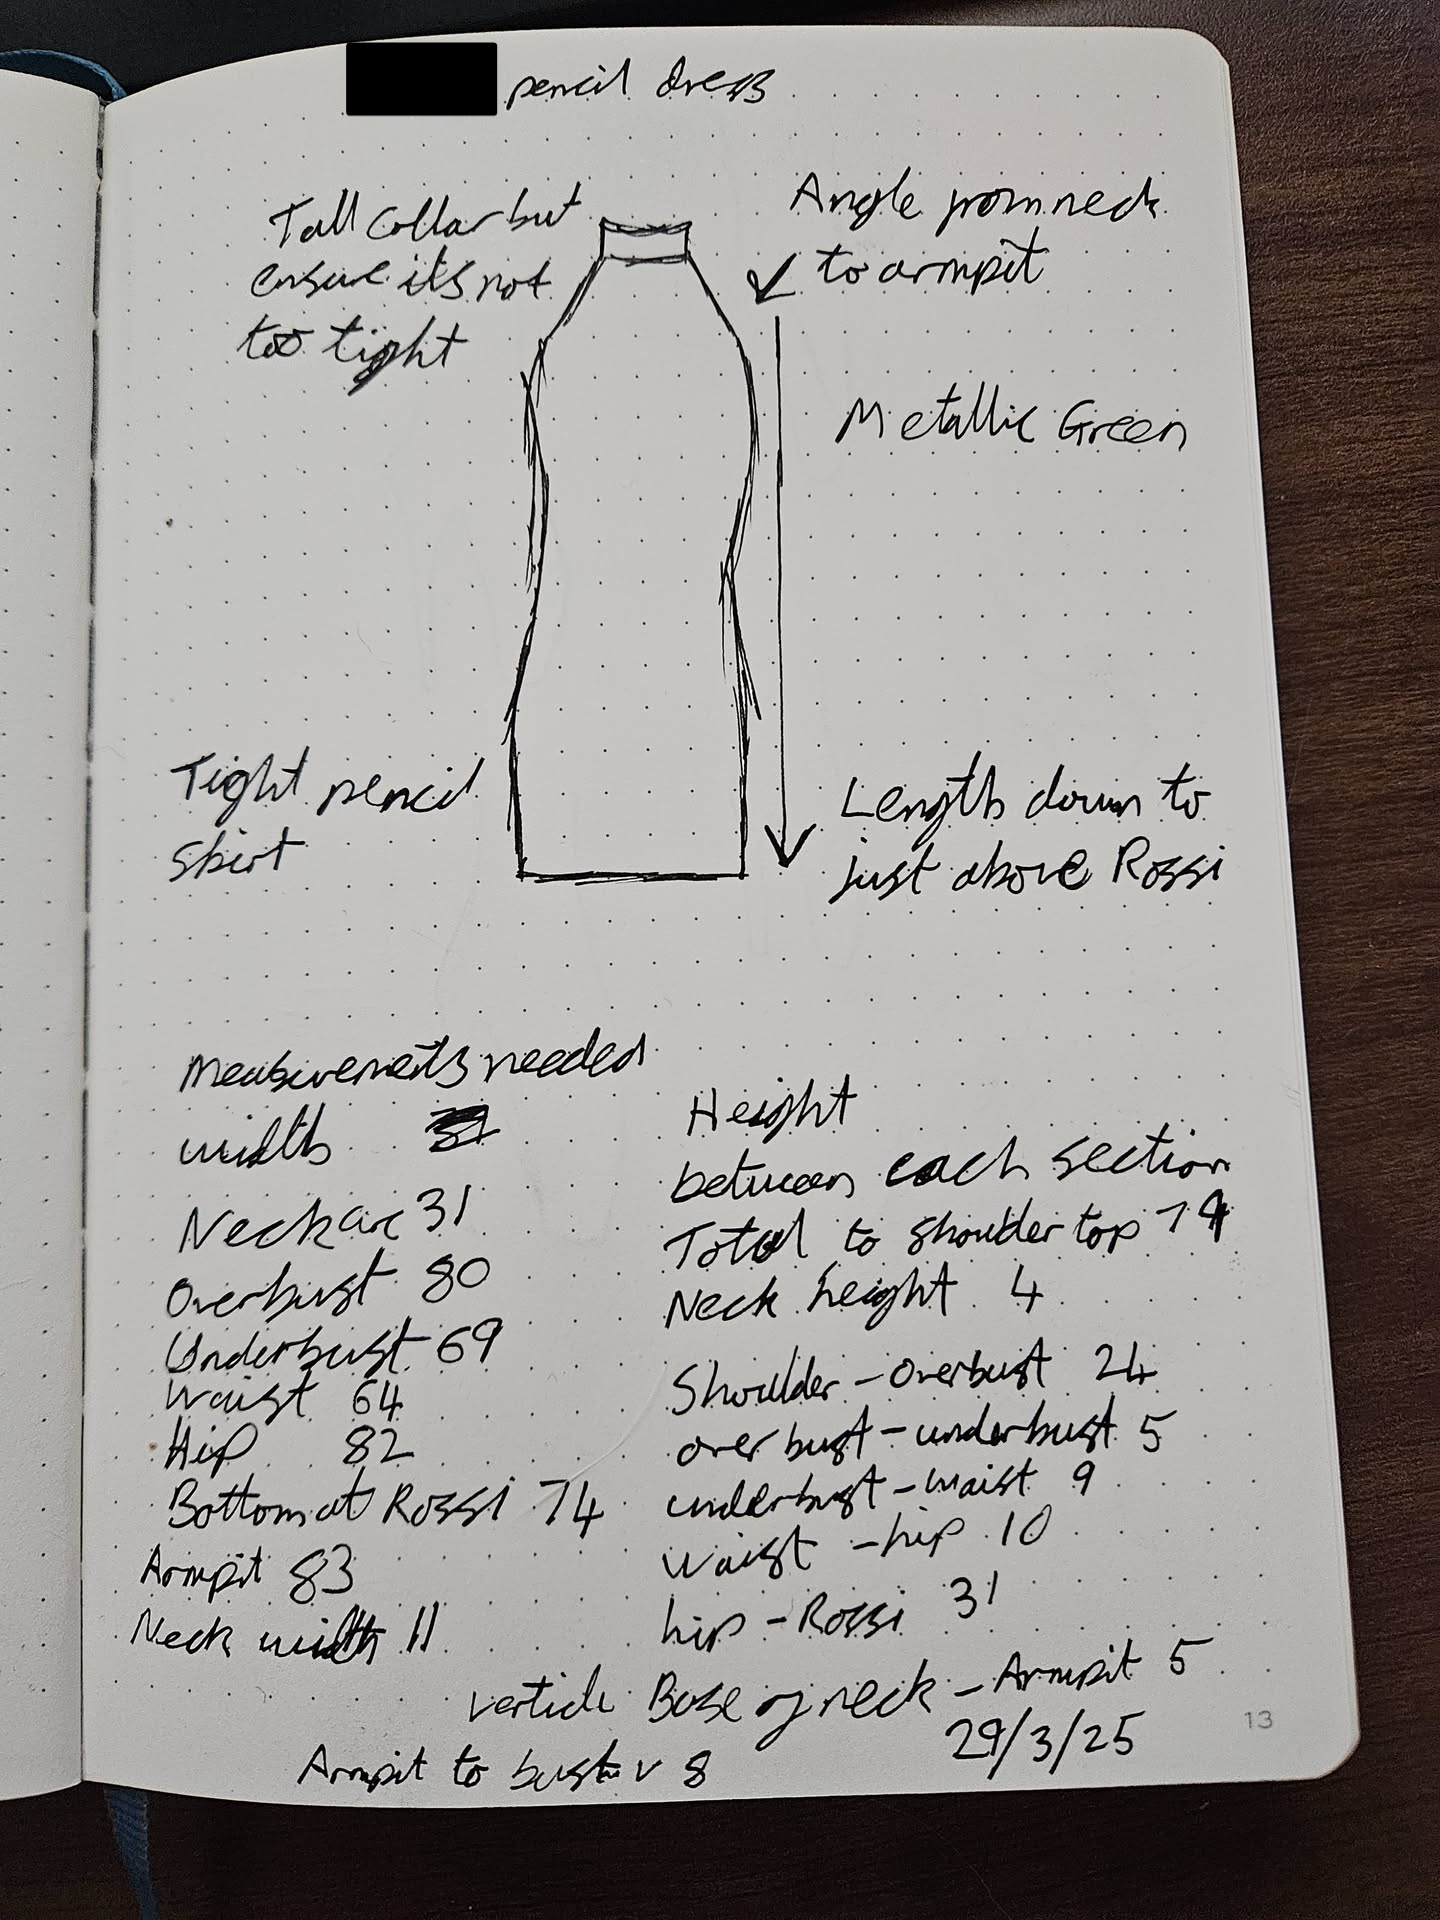 I feel like a pencil dress is a lot simpler than a lot of things I've done, this one has a total of 6 seams for example for the entire garment. I did have a bit of trouble getting my head around making my thoughts into a pattern as usual, but honestly I definitely feel like I'm getting the hang of it. I was able to figure out those puzzles I got up to fairly quickly. In some ways it's nice making something for my partner because I was able to look at her and compare it to the design I was making to see if things seemed right, instead of usually making them for myself where best I have is a mirror and can't see all of me. After all that I ended up with these 2 pieces, simple right?
 As usual with my patterns, I'll double them over in another bit of software and get them ready for laser cutting. p.s. I'm writing a proper run down of the laser cutter that goes over this in more detail, I imagine this will get posted first though so stay tuned. I also added a little rectangular piece in the laser cutting software to make the collar as it's easy enough to do right before cutting. And so that leaves us up to the next stage of the cutting!
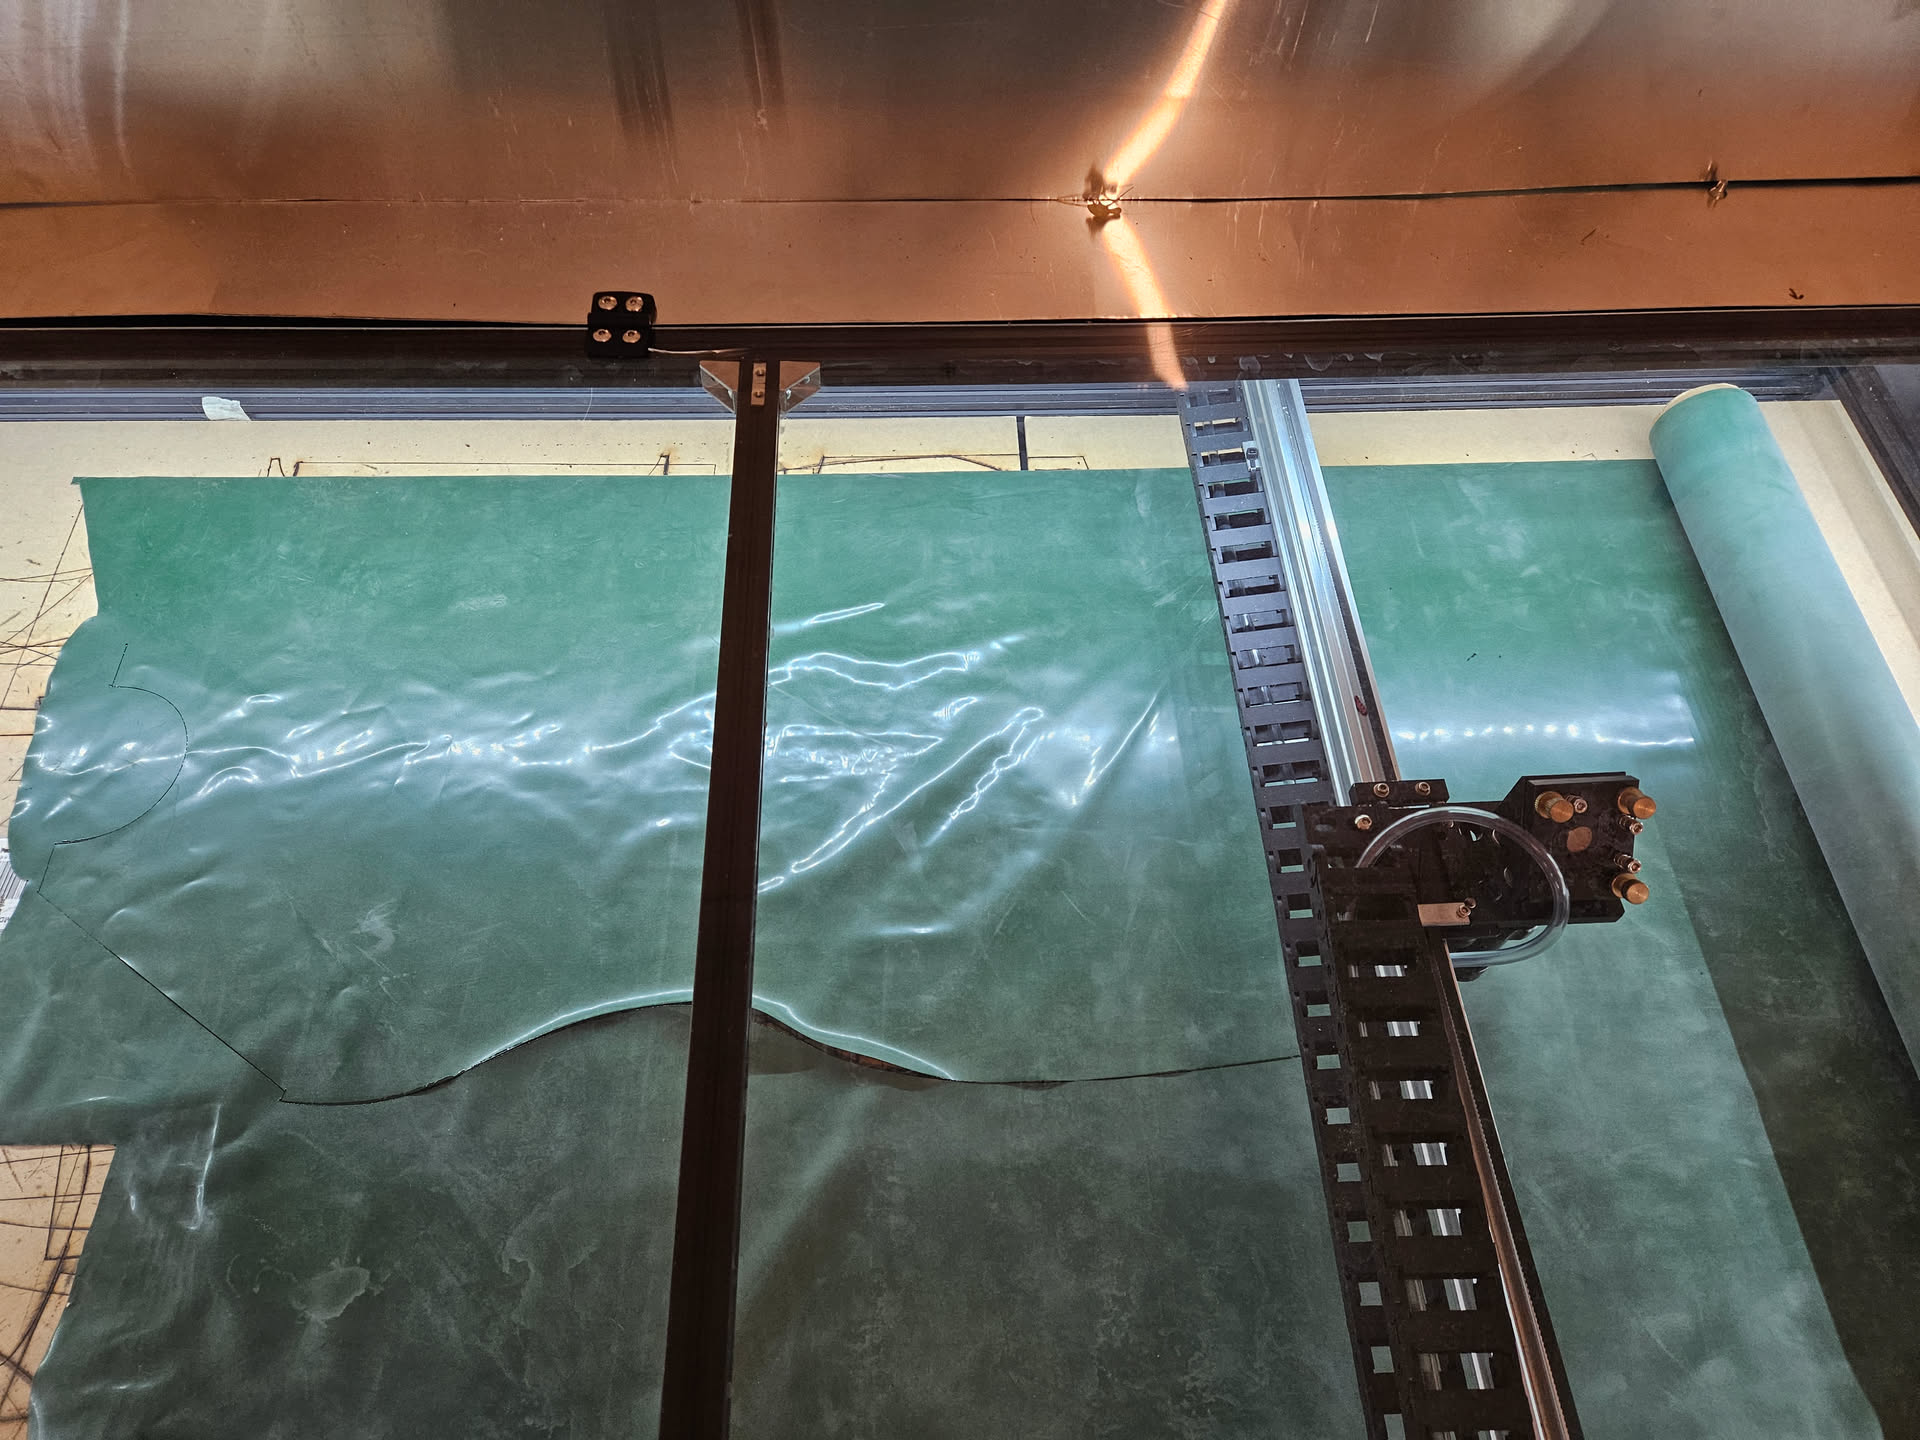
 This was the only roll of the Metallic Purple that I had, so at this point the project went mostly on hiatus until I ordered some more material. But because I order the material from the UK and shipping is expensive, I tend to try and only do a bigger order occasionally, last one I did would have been 2019.
I did assemble the top of the dress at the time and try it on, found a few things to tweak in the pattern, after all this is the point of testing it. These changes made it into some other garments I made during the hiatus, such as a swimsuit (wow another thing I need to show off here).
This was the only roll of the Metallic Purple that I had, so at this point the project went mostly on hiatus until I ordered some more material. But because I order the material from the UK and shipping is expensive, I tend to try and only do a bigger order occasionally, last one I did would have been 2019.
I did assemble the top of the dress at the time and try it on, found a few things to tweak in the pattern, after all this is the point of testing it. These changes made it into some other garments I made during the hiatus, such as a swimsuit (wow another thing I need to show off here).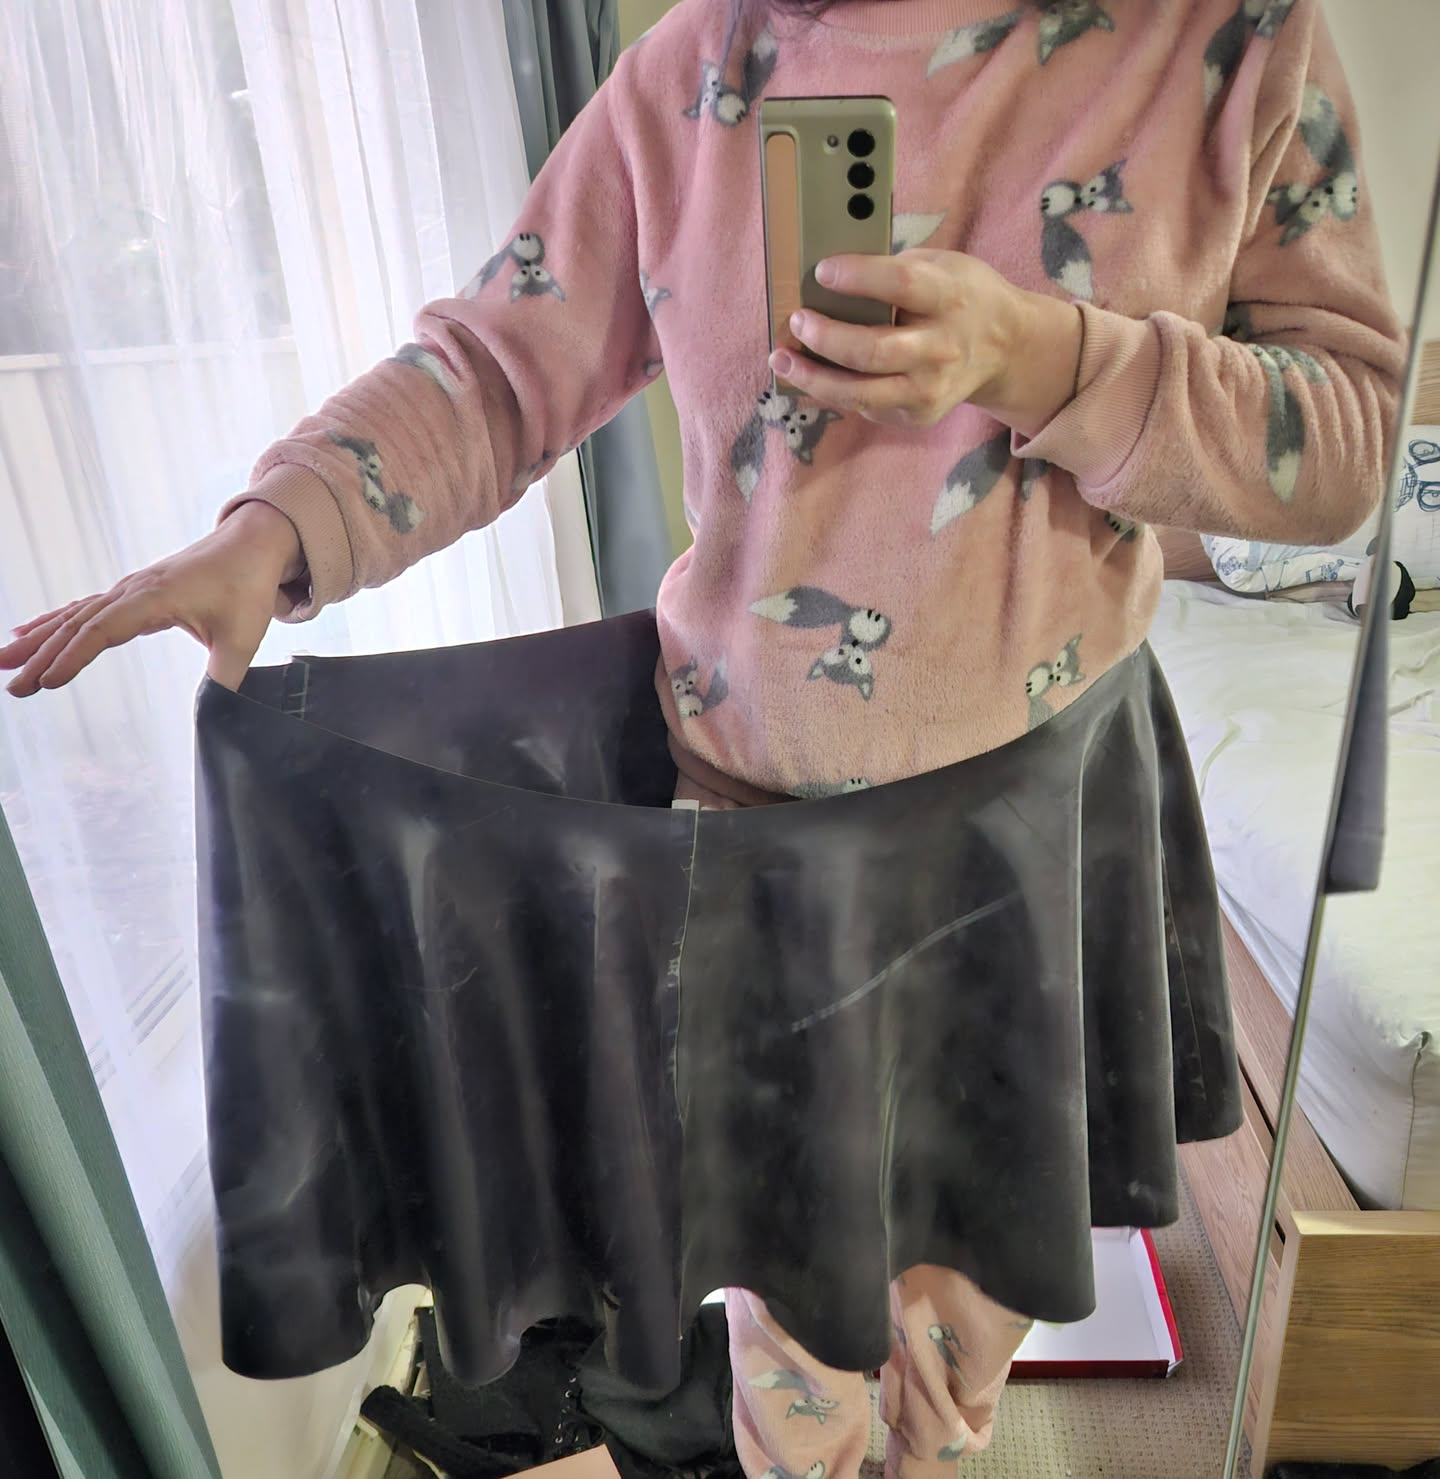
 Obviously I should have done this, and that's what I have now done to correct my mistake but it does mean I'm left with that giant skirt. Which I guess leaves the question of what I'll do with it, well after this project I'm basically out of Metallic Purple again but those skirt pieces can be cut up for smaller items. No specific plans as of yet but I guess it goes on the scraps and oddments piles which let me tell you, really build up over 10 years.
 I'm actually really happy with how this came out and it definitely has proven to be a valid test for my fancy material. I'm glad I did it on something like this first considering all the trials it went through. Even when putting it on for the first time it just went on so easily, I guess I just got the fit that right for me which is also amazing. The green dress for example used a blouse pattern I found on the internet that wasn't sized for me so not a perfect fit, but this one was fully designed for me.
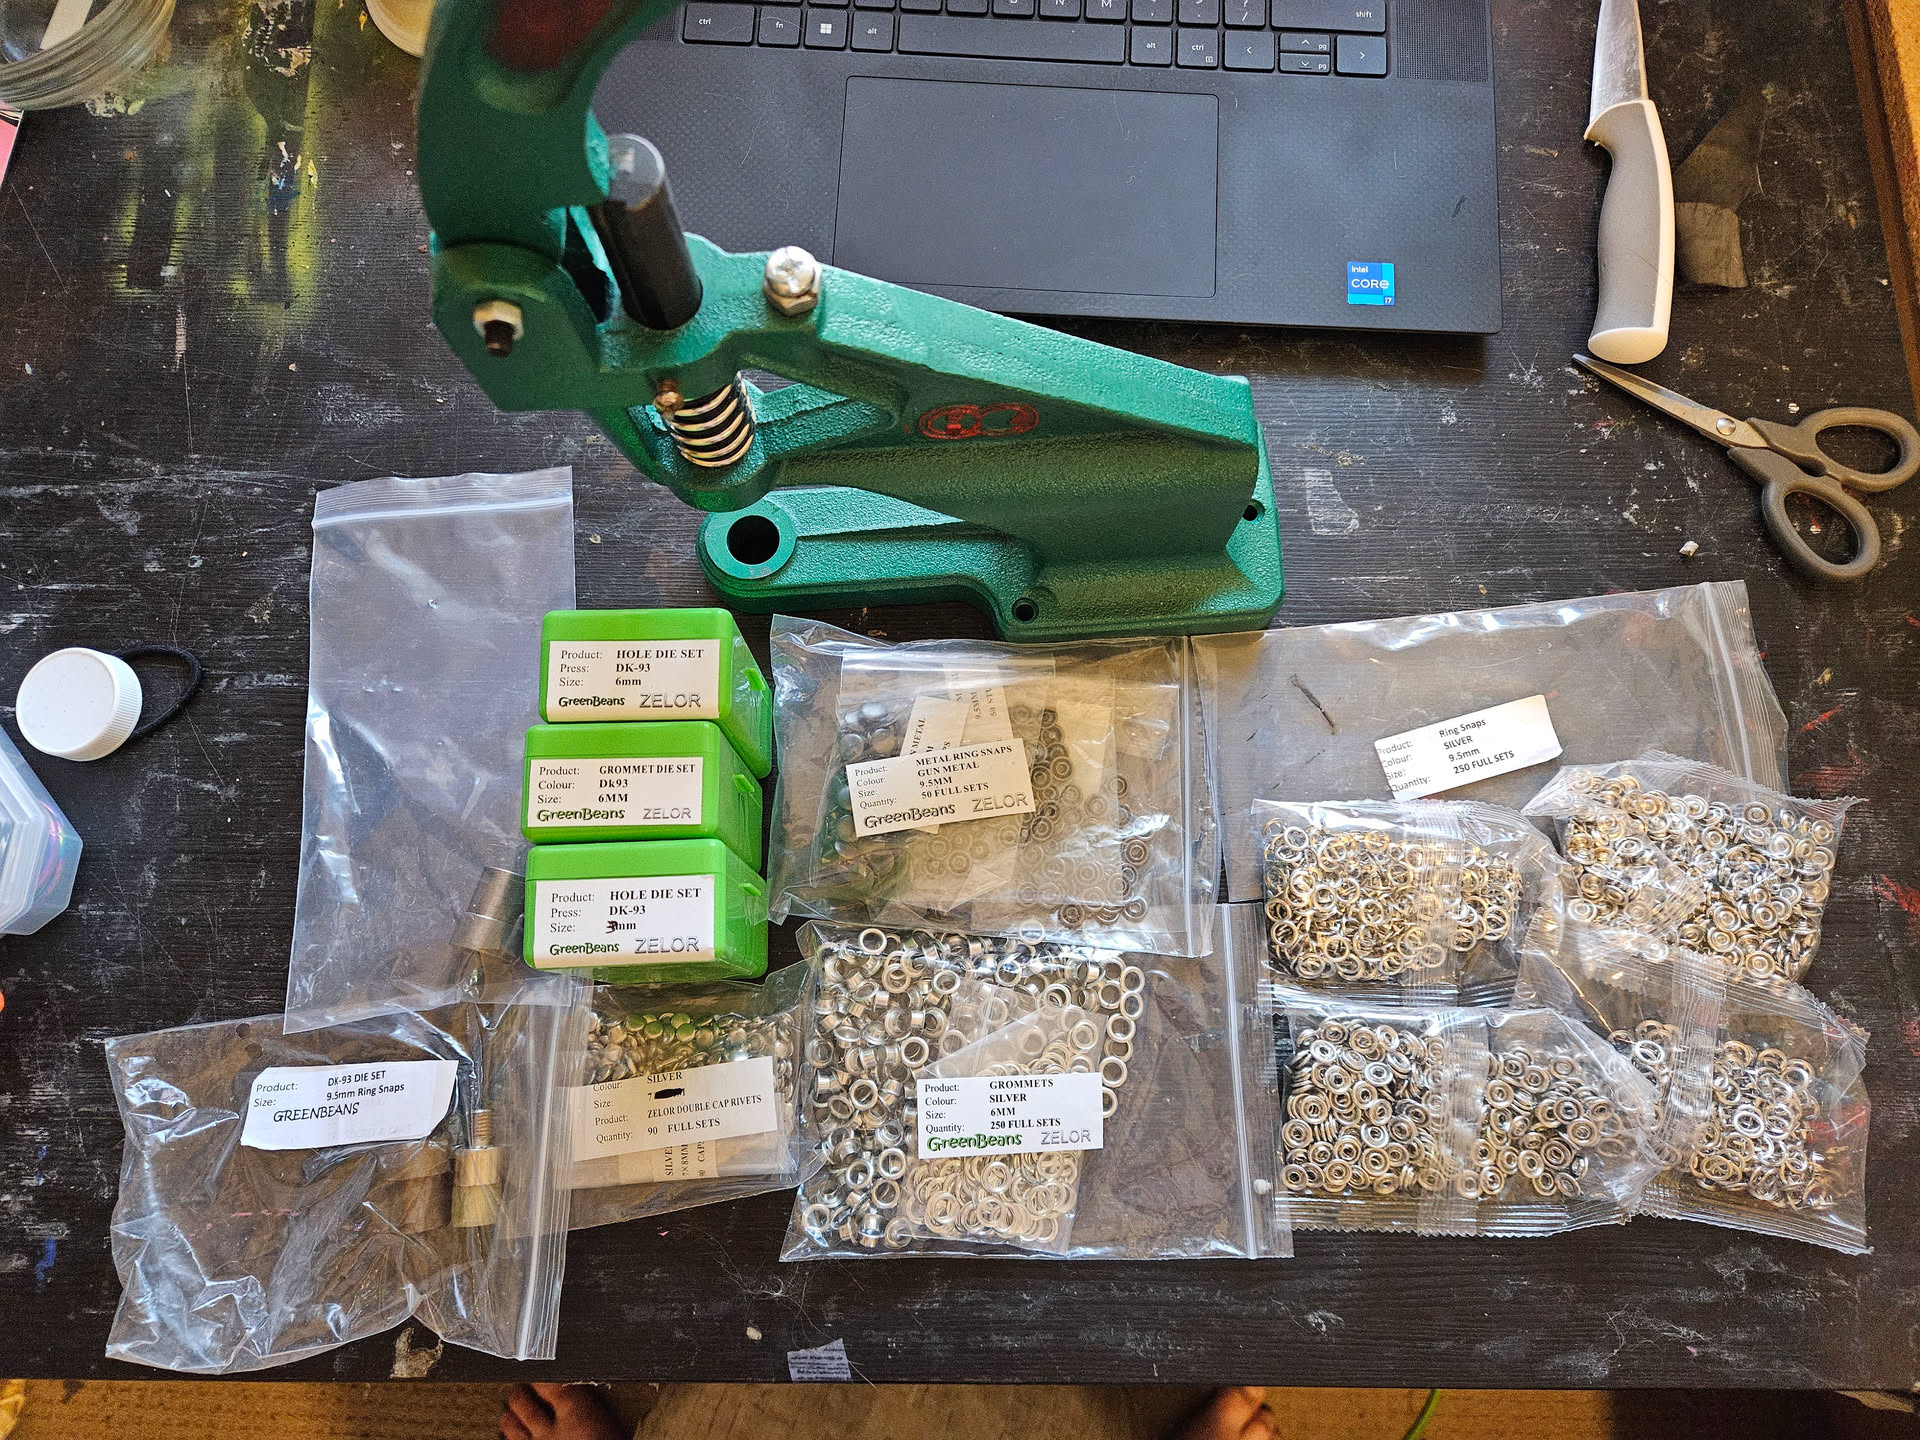
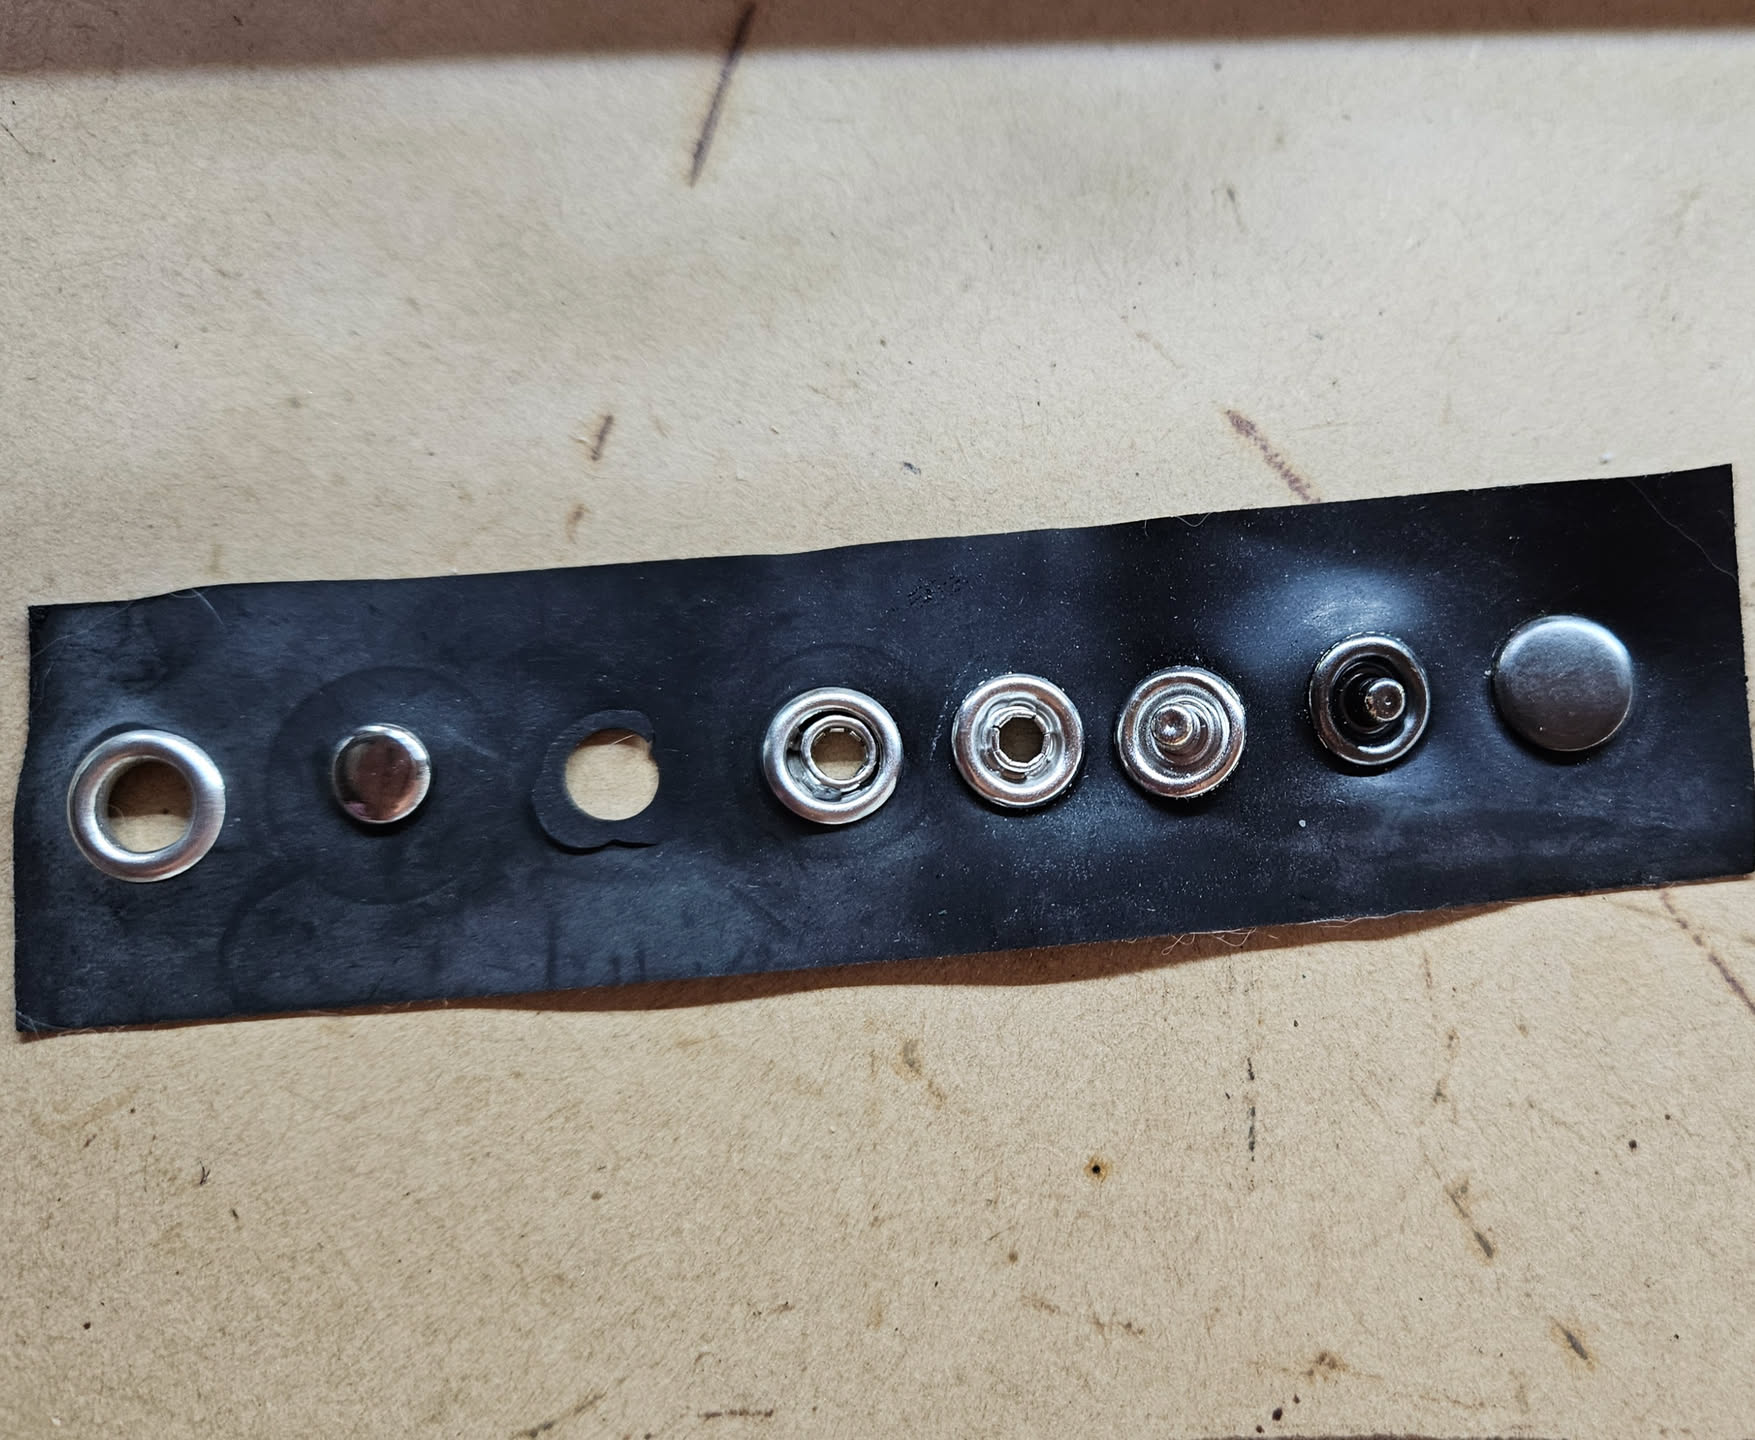 So in order of left to right we have
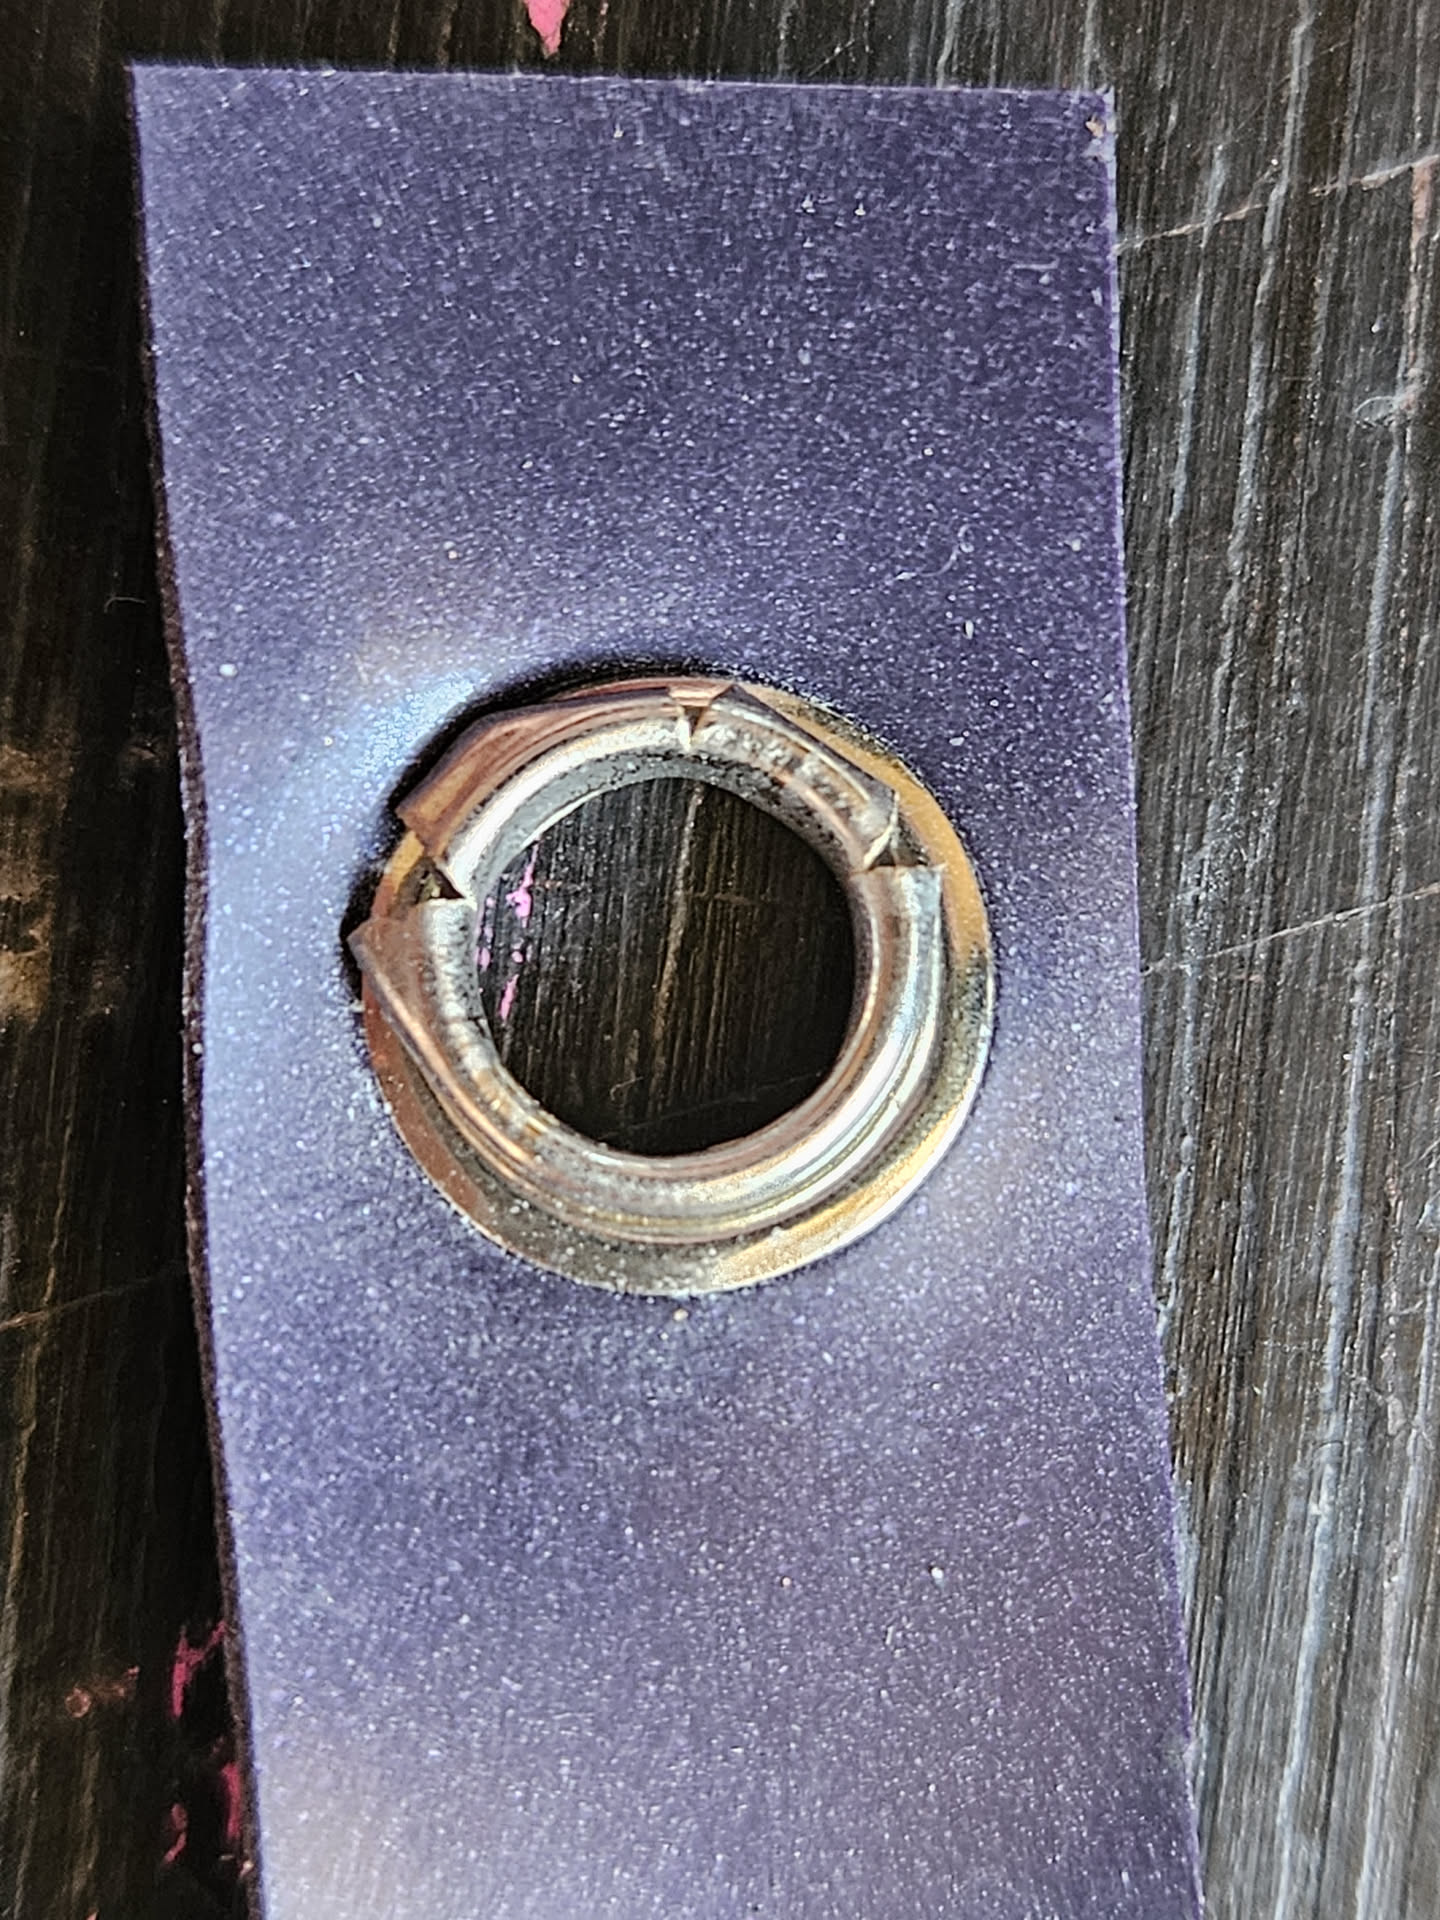
 One problem I had found when looking to purchase these parts is so many places don't even state WHAT they are made from, and it seems what I've bought here is not safe. Potentially the materials are mixed in my lot so I'll try the other styles I have on some white scraps as well (white makes it very obvious) and see how it goes. Worst case scenario is I have ones to use for non-latex projects but I still have all the tools ready for some new safer ones in the future.
I'm sure part of my limitations with finding safe ones are having fewer options of where to buy from here in Australia compared to other places in the world. The shop I purchased them from had a hefty sale as they are shutting down, so that also encouraged me to go there, but hey, atleast the tools were discounted too.
There will definitely be more poppers and rivets in my future crafts, even if there is a slight delay to get some more, so stay tuned for that!
One problem I had found when looking to purchase these parts is so many places don't even state WHAT they are made from, and it seems what I've bought here is not safe. Potentially the materials are mixed in my lot so I'll try the other styles I have on some white scraps as well (white makes it very obvious) and see how it goes. Worst case scenario is I have ones to use for non-latex projects but I still have all the tools ready for some new safer ones in the future.
I'm sure part of my limitations with finding safe ones are having fewer options of where to buy from here in Australia compared to other places in the world. The shop I purchased them from had a hefty sale as they are shutting down, so that also encouraged me to go there, but hey, atleast the tools were discounted too.
There will definitely be more poppers and rivets in my future crafts, even if there is a slight delay to get some more, so stay tuned for that!![[pokemon_legging_outfit.png]](https://zestylatex.com/uploads/pokemonleggingoutfit.png) The other week I was sitting at dinner out with some friends and I was wearing a pair of my black latex leggings as part of the outfit. Towards the end of the meal I suddenly realised my leggings had spit. Thankfully between my dress and the split being pretty small it wasn't obvious to anyone, not even myself really.
My early assessment proved to be correct, a seam had come undone. The best part about that is it's the easiest kind of hole to fix, doesn't need a patch like a tear would as everything already overlaps. So while I repair it, I thought I'd give a bit of a reflection on these leggings.
The other week I was sitting at dinner out with some friends and I was wearing a pair of my black latex leggings as part of the outfit. Towards the end of the meal I suddenly realised my leggings had spit. Thankfully between my dress and the split being pretty small it wasn't obvious to anyone, not even myself really.
My early assessment proved to be correct, a seam had come undone. The best part about that is it's the easiest kind of hole to fix, doesn't need a patch like a tear would as everything already overlaps. So while I repair it, I thought I'd give a bit of a reflection on these leggings. The pattern for these is an old one, infact trace back its lineage and it is the very first pattern I used for any latex way back in 2015, just with a few tweaks over the years. Whether these issues come from the original that I bought, or the modifications I did through the years is kinda hard to tell. While I still have a copy of the original, I'm not planning to make it again anytime soon as my measurements have changed and I want things that I make to fit.
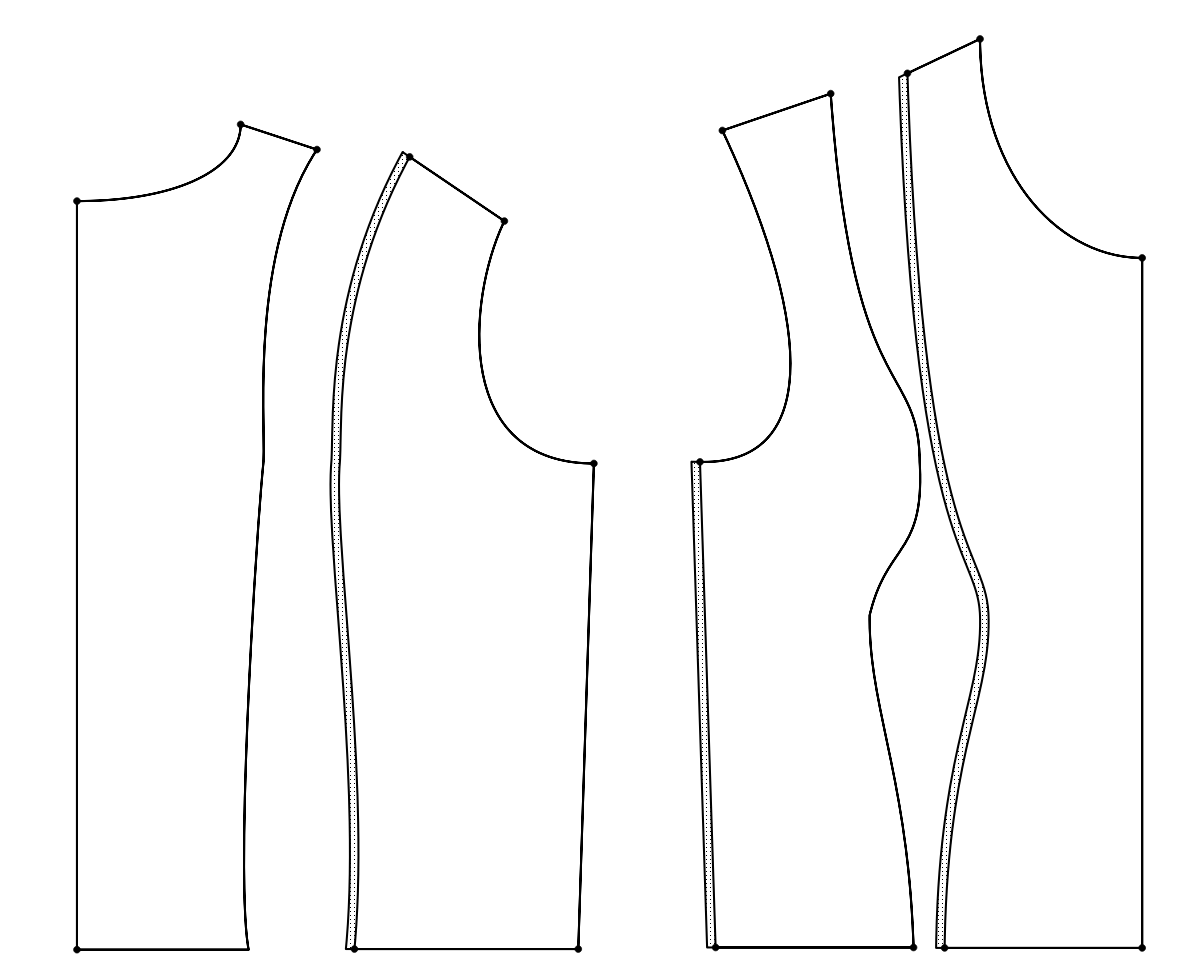
![[ripple.jpg]](https://zestylatex.com/uploads/ripple.jpg) (Sorry about the cat fluff, you try enjoying latex while owning multiple fluffy cats, it doesn't work well)
One side of it is 76.87cm and the other side is 72.70cm, so when you glue it all together one end sticks out 4.17cm (1.6 inches) and just doesn't look right. To account for this bad pattern design a simple solution (that you can see I employed here) is to stretch the short side out a bit as you go along to make up for it being shorter. This means that when not being worn the seam will get this ripple as it's all contracted, but when being worn it's all pretty flat and not really noticeable. While I can't say I've empirically tested it, I also imagine it makes it a weaker joint. The short version is it works, but it's not a great thing to do if you can avoid it.
(Sorry about the cat fluff, you try enjoying latex while owning multiple fluffy cats, it doesn't work well)
One side of it is 76.87cm and the other side is 72.70cm, so when you glue it all together one end sticks out 4.17cm (1.6 inches) and just doesn't look right. To account for this bad pattern design a simple solution (that you can see I employed here) is to stretch the short side out a bit as you go along to make up for it being shorter. This means that when not being worn the seam will get this ripple as it's all contracted, but when being worn it's all pretty flat and not really noticeable. While I can't say I've empirically tested it, I also imagine it makes it a weaker joint. The short version is it works, but it's not a great thing to do if you can avoid it.